Key note categories and examples for tech issues
Make an air quality sensor node
This is an example note
This note captures the journey of planning and creating an air quality sensor node with a Raspberry Pi. I took this note while preparing to post the above video on YouTube. It encompasses the selection of hardware components, the setup of the development environment, and the step-by-step integration of sensors to measure air quality. Key elements of the note include:
- Links: Resources, product information, and technical documentation
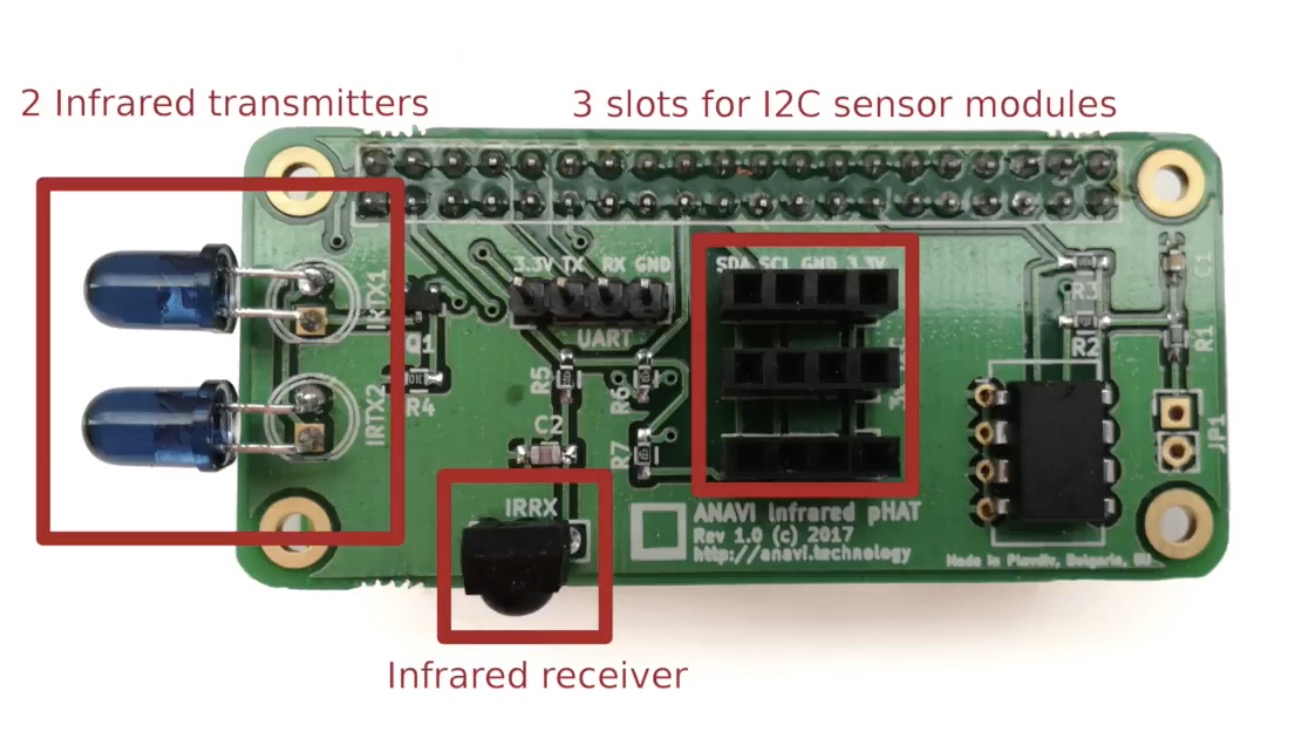
- Hardware selection: Insights into choosing the MH-Z19B CO2 sensor and ANAVI Infrared pHAT
- Development environment: Guidance on preparing the Raspberry Pi with the necessary software, configuring GPIO pins, and troubleshooting installation issues
- Sensor integration and troubleshooting: Process of connecting and configuring multiple sensors to track CO2 levels, temperature, humidity, and barometric pressure, including solutions to encountered challenges.
- Data management: Exploration of using Firestore for data storage, highlighting the limitations faced due to hardware constraints and alternatives considered.
- Reflections on future enhancements: Considerations for future project improvements, such as incorporating additional sensors, refining auto-calibration, and optimizing UART communication.
links
- Raspberry Pi OS – Raspberry Pi
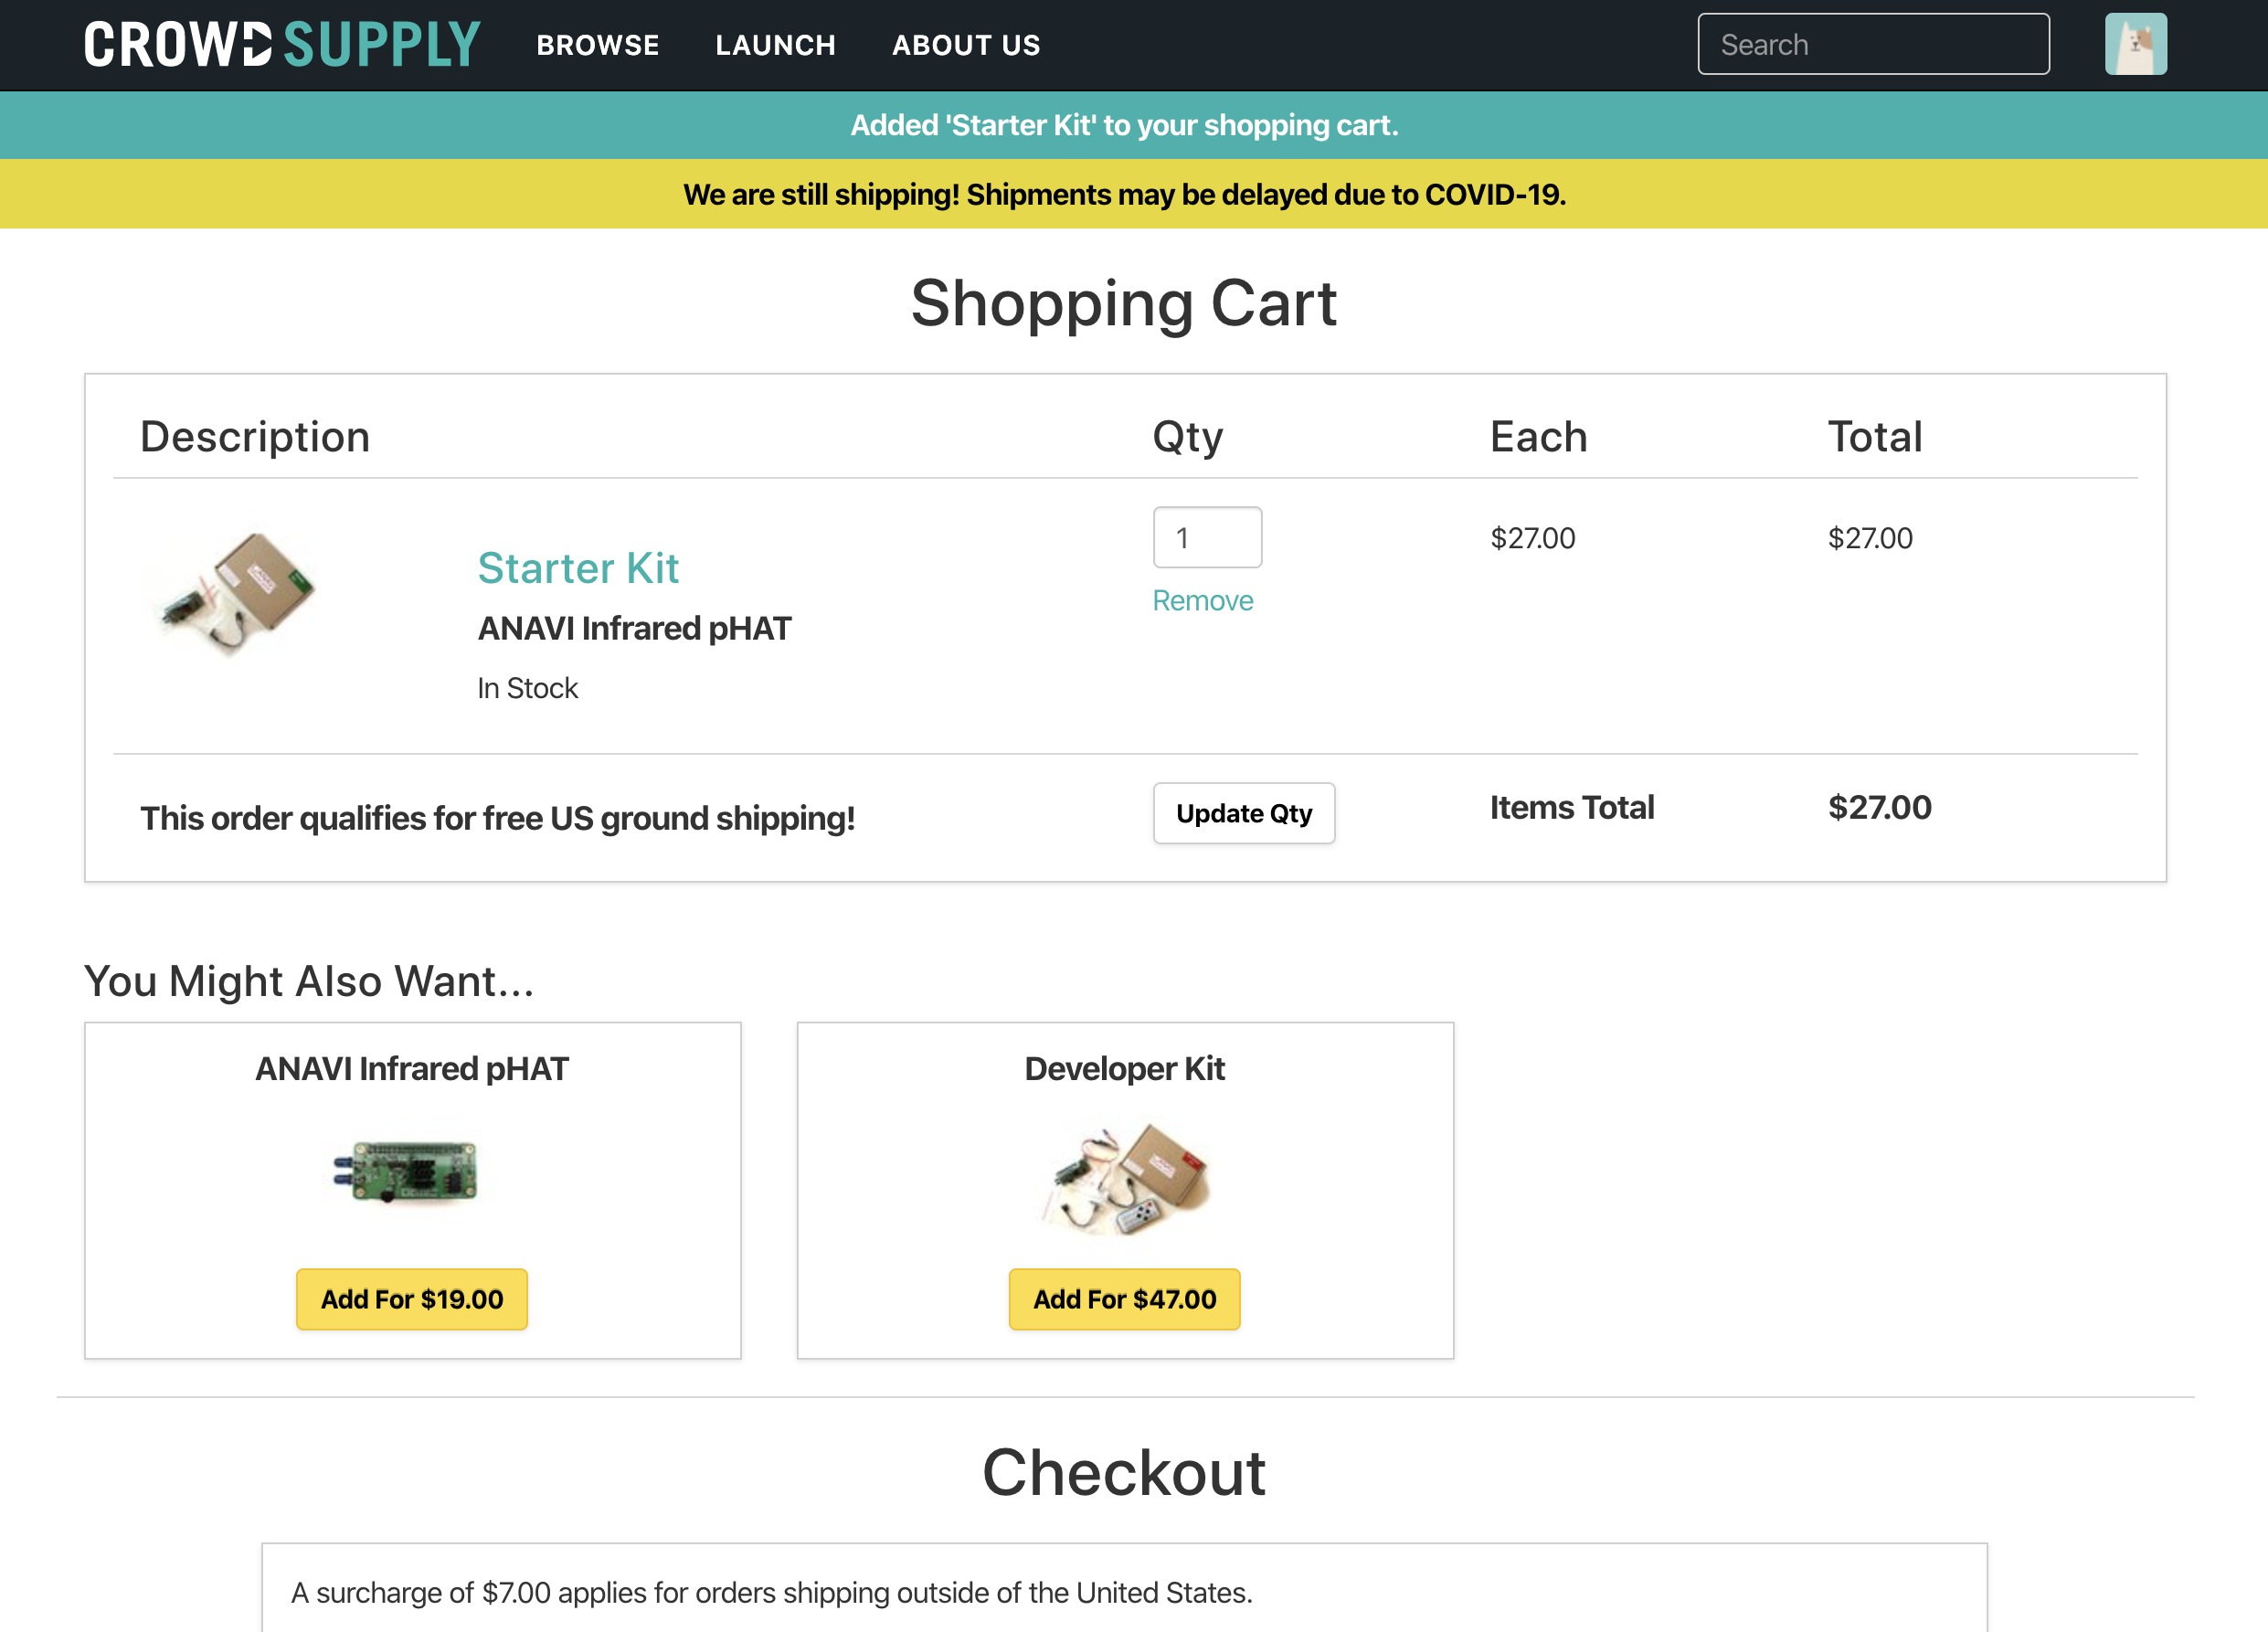
- ANAVI Infrared pHAT | Crowd Supply
- anavi-examples/Makefile at master · AnaviTechnology/anavi-examples
- Raspberry Piとgo言語で部屋のコンディションを記録してグラフ化した - 丁寧に手を抜く
- https://learn.adafruit.com/adafruits-raspberry-pi-lesson-4-gpio-setup/configuring-i2c
apt
- git
- build-essential
- wiringpi
Add CO2 sensor to Raspberry Pi 3
- Parts: MH-Z19B
I'd like to add it onto ANAVI Infrared pHAT | Crowd Supply.
Related articles

| Function | Raspi pin | MH-Z19 pin |
|---|---|---|
| Vcc +5V | 2 +5V | 6 Vin |
| GND | 6 GND | 7 GND |
| UART | 8 TXD0 | 2 RXD |
| UART | 10 RXD0 | 3 TXD |
Install
pi@raspberrypi:~ $ gpio readall
 +-----+-----+---------+------+---+---Pi 3---+---+------+---------+-----+-----+
 | BCM | wPi |   Name  | Mode | V | Physical | V | Mode | Name    | wPi | BCM |
 +-----+-----+---------+------+---+----++----+---+------+---------+-----+-----+
 |     |     |    3.3v |      |   |  1 || 2  |   |      | 5v      |     |     |
 |   2 |   8 |   SDA.1 | ALT0 | 1 |  3 || 4  |   |      | 5v      |     |     |
 |   3 |   9 |   SCL.1 | ALT0 | 1 |  5 || 6  |   |      | 0v      |     |     |
 |   4 |   7 | GPIO. 7 |   IN | 1 |  7 || 8  | 1 | IN   | TxD     | 15  | 14  |
 |     |     |      0v |      |   |  9 || 10 | 1 | IN   | RxD     | 16  | 15  |
 |  17 |   0 | GPIO. 0 |  OUT | 0 | 11 || 12 | 1 | IN   | GPIO. 1 | 1   | 18  |
 |  27 |   2 | GPIO. 2 |   IN | 0 | 13 || 14 |   |      | 0v      |     |     |
 |  22 |   3 | GPIO. 3 |   IN | 0 | 15 || 16 | 0 | IN   | GPIO. 4 | 4   | 23  |
 |     |     |    3.3v |      |   | 17 || 18 | 0 | IN   | GPIO. 5 | 5   | 24  |
 |  10 |  12 |    MOSI |   IN | 0 | 19 || 20 |   |      | 0v      |     |     |
 |   9 |  13 |    MISO |   IN | 0 | 21 || 22 | 0 | IN   | GPIO. 6 | 6   | 25  |
 |  11 |  14 |    SCLK |   IN | 0 | 23 || 24 | 1 | IN   | CE0     | 10  | 8   |
 |     |     |      0v |      |   | 25 || 26 | 1 | IN   | CE1     | 11  | 7   |
 |   0 |  30 |   SDA.0 |   IN | 1 | 27 || 28 | 1 | IN   | SCL.0   | 31  | 1   |
 |   5 |  21 | GPIO.21 |   IN | 1 | 29 || 30 |   |      | 0v      |     |     |
 |   6 |  22 | GPIO.22 |   IN | 1 | 31 || 32 | 0 | IN   | GPIO.26 | 26  | 12  |
 |  13 |  23 | GPIO.23 |   IN | 0 | 33 || 34 |   |      | 0v      |     |     |
 |  19 |  24 | GPIO.24 |   IN | 0 | 35 || 36 | 0 | IN   | GPIO.27 | 27  | 16  |
 |  26 |  25 | GPIO.25 |   IN | 0 | 37 || 38 | 0 | IN   | GPIO.28 | 28  | 20  |
 |     |     |      0v |      |   | 39 || 40 | 0 | IN   | GPIO.29 | 29  | 21  |
 +-----+-----+---------+------+---+----++----+---+------+---------+-----+-----+
 | BCM | wPi |   Name  | Mode | V | Physical | V | Mode | Name    | wPi | BCM |
 +-----+-----+---------+------+---+---Pi 3---+---+------+---------+-----+-----+
Install pip:
sudo apt install python3-pip
It doesn't work!
pi@raspberrypi:~ $ sudo python3 -m mh_z19
null
Seems like I bought a wrong pin header which pins are narrower than normal.
https://twitter.com/craftzdog/status/1249296712679612417
Enabling serial port needed
Got it to work!!
pi@raspberrypi:~ $ gpio readall
 +-----+-----+---------+------+---+---Pi 3---+---+------+---------+-----+-----+
 | BCM | wPi |   Name  | Mode | V | Physical | V | Mode | Name    | wPi | BCM |
 +-----+-----+---------+------+---+----++----+---+------+---------+-----+-----+
 |     |     |    3.3v |      |   |  1 || 2  |   |      | 5v      |     |     |
 |   2 |   8 |   SDA.1 | ALT0 | 1 |  3 || 4  |   |      | 5v      |     |     |
 |   3 |   9 |   SCL.1 | ALT0 | 1 |  5 || 6  |   |      | 0v      |     |     |
 |   4 |   7 | GPIO. 7 |   IN | 1 |  7 || 8  | 1 | ALT5 | TxD     | 15  | 14  |
 |     |     |      0v |      |   |  9 || 10 | 1 | ALT5 | RxD     | 16  | 15  |
 |  17 |   0 | GPIO. 0 |   IN | 0 | 11 || 12 | 0 | IN   | GPIO. 1 | 1   | 18  |
 |  27 |   2 | GPIO. 2 |   IN | 0 | 13 || 14 |   |      | 0v      |     |     |
 |  22 |   3 | GPIO. 3 |   IN | 0 | 15 || 16 | 0 | IN   | GPIO. 4 | 4   | 23  |
 |     |     |    3.3v |      |   | 17 || 18 | 0 | IN   | GPIO. 5 | 5   | 24  |
 |  10 |  12 |    MOSI |   IN | 0 | 19 || 20 |   |      | 0v      |     |     |
 |   9 |  13 |    MISO |   IN | 0 | 21 || 22 | 0 | IN   | GPIO. 6 | 6   | 25  |
 |  11 |  14 |    SCLK |   IN | 0 | 23 || 24 | 1 | IN   | CE0     | 10  | 8   |
 |     |     |      0v |      |   | 25 || 26 | 1 | IN   | CE1     | 11  | 7   |
 |   0 |  30 |   SDA.0 |   IN | 1 | 27 || 28 | 1 | IN   | SCL.0   | 31  | 1   |
 |   5 |  21 | GPIO.21 |   IN | 1 | 29 || 30 |   |      | 0v      |     |     |
 |   6 |  22 | GPIO.22 |   IN | 1 | 31 || 32 | 0 | IN   | GPIO.26 | 26  | 12  |
 |  13 |  23 | GPIO.23 |   IN | 0 | 33 || 34 |   |      | 0v      |     |     |
 |  19 |  24 | GPIO.24 |   IN | 0 | 35 || 36 | 0 | IN   | GPIO.27 | 27  | 16  |
 |  26 |  25 | GPIO.25 |   IN | 0 | 37 || 38 | 0 | IN   | GPIO.28 | 28  | 20  |
 |     |     |      0v |      |   | 39 || 40 | 0 | IN   | GPIO.29 | 29  | 21  |
 +-----+-----+---------+------+---+----++----+---+------+---------+-----+-----+
 | BCM | wPi |   Name  | Mode | V | Physical | V | Mode | Name    | wPi | BCM |
 +-----+-----+---------+------+---+---Pi 3---+---+------+---------+-----+-----+

pi@raspberrypi:~ $ sudo python -m mh_z19
{"co2": 1917}
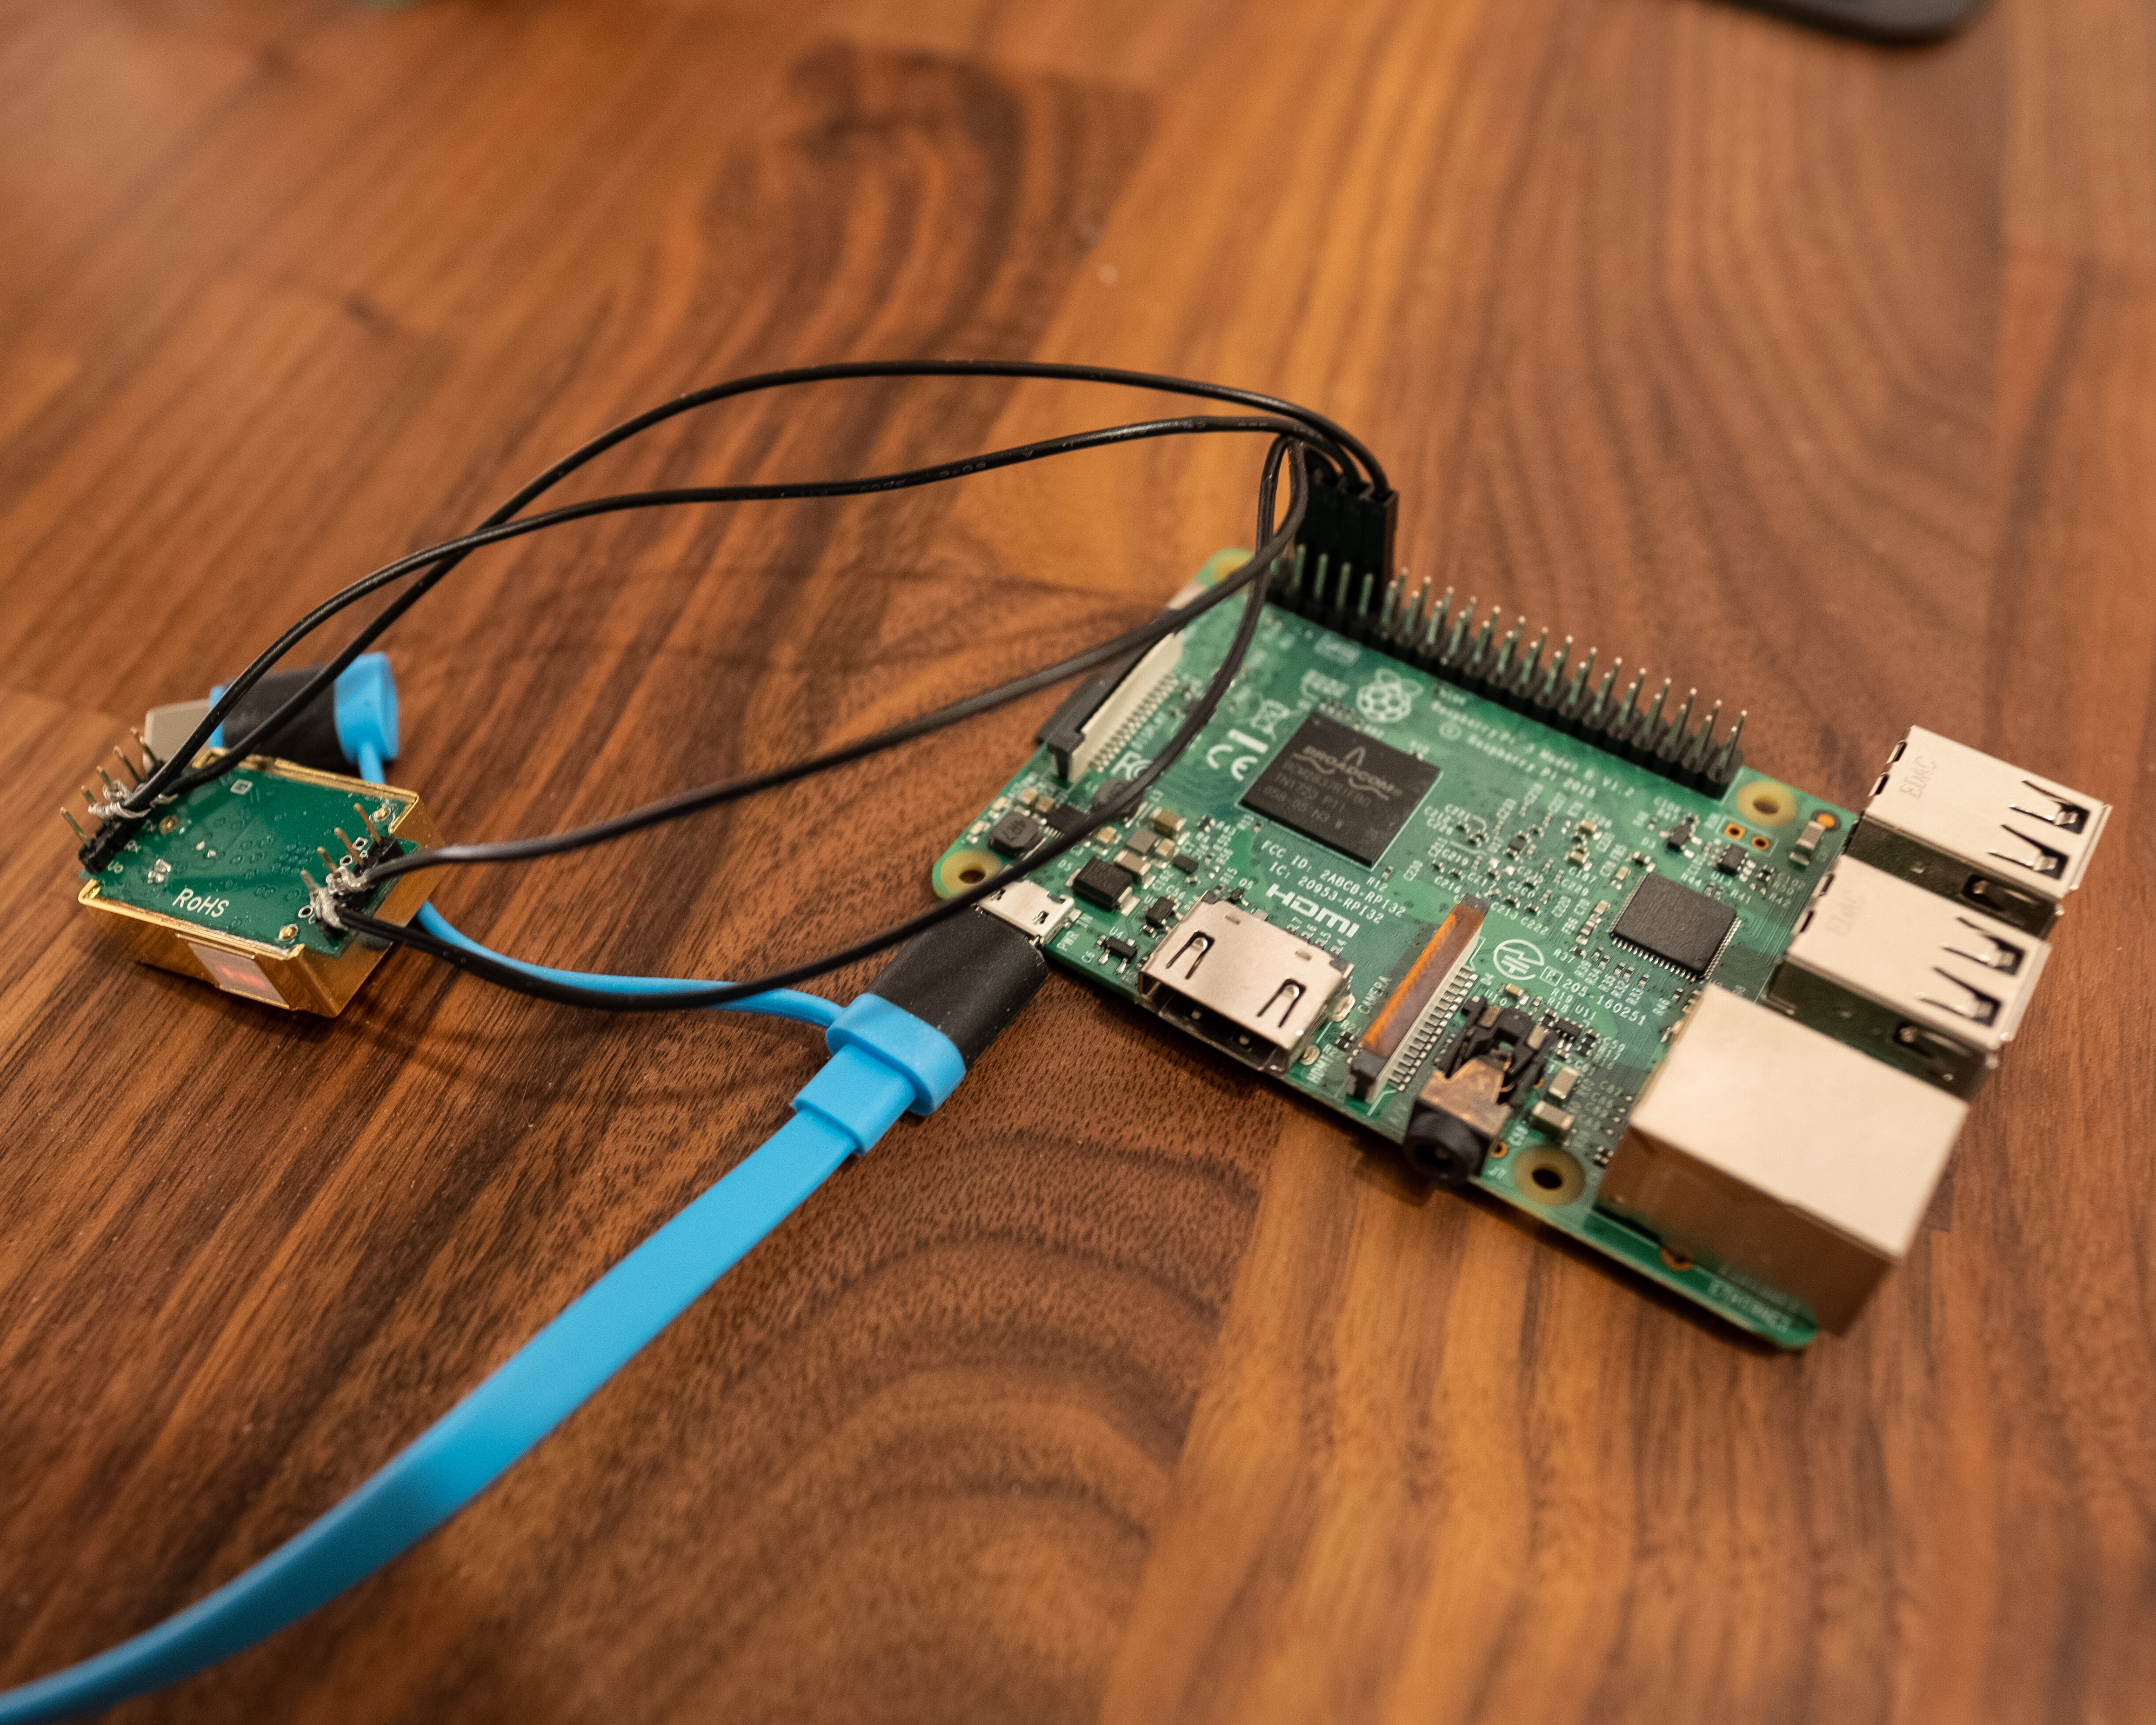
But it turned out that it has to be connected directly with Raspberry Pi 3. It didn't work with ANAVI pHAT. So, I have to buy another device for the sensor.
Here is what it looks like:
Calibration
I have to have a calibration for this device. To do it, leave the device outside for more than 20 minutes first. And execute zero point calibration, as the manual says:
ZERO POINT is 400PPM, PLS MAKE SURE THE SENSOR HAD BEEN WORKED UNDER 400PPM FOR OVER 20MINUTES
This review would be helpful:
Bought two sensors. From the box, both showed +/- 80ppm, which fits into the error sensor. Initially I was happy with everything, but later an unpleasant nuance came out. There is such a thing as auto-calibration in this sensor. To understand the problem, a small introduction: the average outdoor atmospheric CO2 content is 400ppm. In different meters it is a bit different: in the city may be 450, in the forest during the day 350, but this is not critical. The sensor is calibrated relative to 400ppm. Auto-calibration works as follows: After working for some time (about 24 hours), 400ppm takes the lowest CO2 value in that time. The problem is that 400ppm never happens in an apartment, especially in winter, when the windows are mostly closed. Within a few days, the sensor started to lie very hard in the smaller direction, as the 400ppm mark was shifted due to the auto-calibration. It is possible to recalibrate, but it should be done outdoors within the operating temperature range of the sensor (0-50), and we have a long time ago minus... I advise you to switch off the auto-calibration as soon as possible.
Suddenly there were a couple of warm days at the end of November with temperatures above 0, I decided to try recalibrating the sensor just by putting out the window for a few hours and sending a forced calibration command. Surprisingly, the readings were much more realistic than after autocalibration. Once again, the sensor can be used for its intended purpose, even if with a little error. For domestic purposes, it's not critical. Conclusion: Auto-calibration is evil, but it's treatable. In summer, if recalibrated again in nature, away from the city, and so far will go :).
from https://ja.aliexpress.com/item/32672336586.html
To calibrate:
Buy an Android phone stand
- Would be nice to use it for displaying air quality like this!
Future work
Add another UART port?
- How to get more than one uart interface - Raspberry Pi Stack Exchange
- FTDI Basic Breakout 3.3/5V (Arduino Compatible) - DFRobot
Read it from different serial port:
Should I buy one of them?
- MM-FT232 教育実習用ツールUSB/シリアル変換基板 1個 サンハヤト 【通販モノタロウ】 89230617
- USB・I2C(SMBus)変換モジュール サンハヤト その他機構部品 【通販モノタロウ】 MM-CP2112A
- No, it's for I2C sensors
Asked a question to Anavi:
Got it to work!!
I learned about UART:
I thought "what if I connected it with RX and TX..?" and boom, it worked!! So, I figured out that RX has to be connected to TX, and vice versa, like so:
Sensor - pHAT
RX - TX
TX - RX
Okaaaay:
pi@raspberrypi:~ $ gpio readall
 +-----+-----+---------+------+---+---Pi 3---+---+------+---------+-----+-----+
 | BCM | wPi |   Name  | Mode | V | Physical | V | Mode | Name    | wPi | BCM |
 +-----+-----+---------+------+---+----++----+---+------+---------+-----+-----+
 |     |     |    3.3v |      |   |  1 || 2  |   |      | 5v      |     |     |
 |   2 |   8 |   SDA.1 | ALT0 | 1 |  3 || 4  |   |      | 5v      |     |     |
 |   3 |   9 |   SCL.1 | ALT0 | 1 |  5 || 6  |   |      | 0v      |     |     |
 |   4 |   7 | GPIO. 7 |   IN | 1 |  7 || 8  | 1 | ALT5 | TxD     | 15  | 14  |
 |     |     |      0v |      |   |  9 || 10 | 1 | ALT5 | RxD     | 16  | 15  |
 |  17 |   0 | GPIO. 0 |  OUT | 0 | 11 || 12 | 1 | IN   | GPIO. 1 | 1   | 18  |
 |  27 |   2 | GPIO. 2 |   IN | 0 | 13 || 14 |   |      | 0v      |     |     |
 |  22 |   3 | GPIO. 3 |   IN | 0 | 15 || 16 | 0 | IN   | GPIO. 4 | 4   | 23  |
 |     |     |    3.3v |      |   | 17 || 18 | 0 | IN   | GPIO. 5 | 5   | 24  |
 |  10 |  12 |    MOSI |   IN | 0 | 19 || 20 |   |      | 0v      |     |     |
 |   9 |  13 |    MISO |   IN | 0 | 21 || 22 | 0 | IN   | GPIO. 6 | 6   | 25  |
 |  11 |  14 |    SCLK |   IN | 0 | 23 || 24 | 1 | IN   | CE0     | 10  | 8   |
 |     |     |      0v |      |   | 25 || 26 | 1 | IN   | CE1     | 11  | 7   |
 |   0 |  30 |   SDA.0 |   IN | 1 | 27 || 28 | 1 | IN   | SCL.0   | 31  | 1   |
 |   5 |  21 | GPIO.21 |   IN | 1 | 29 || 30 |   |      | 0v      |     |     |
 |   6 |  22 | GPIO.22 |   IN | 1 | 31 || 32 | 0 | IN   | GPIO.26 | 26  | 12  |
 |  13 |  23 | GPIO.23 |   IN | 0 | 33 || 34 |   |      | 0v      |     |     |
 |  19 |  24 | GPIO.24 |   IN | 0 | 35 || 36 | 0 | IN   | GPIO.27 | 27  | 16  |
 |  26 |  25 | GPIO.25 |   IN | 0 | 37 || 38 | 0 | IN   | GPIO.28 | 28  | 20  |
 |     |     |      0v |      |   | 39 || 40 | 0 | IN   | GPIO.29 | 29  | 21  |
 +-----+-----+---------+------+---+----++----+---+------+---------+-----+-----+
 | BCM | wPi |   Name  | Mode | V | Physical | V | Mode | Name    | wPi | BCM |
 +-----+-----+---------+------+---+---Pi 3---+---+------+---------+-----+-----+

pi@raspberrypi:~ $ sudo python3 -m mh_z19 --all
{"SS": 0, "co2": 475, "TT": 61, "UhUl": 0, "temperature": 21}
What changed is:
--- /tmp/a.txt  2020-04-16 09:45:40.000000000 +0900
+++ /tmp/b.txt  2020-04-16 09:45:51.000000000 +0900
@@ -6,7 +6,7 @@
  |   3 |   9 |   SCL.1 | ALT0 | 1 |  5 || 6  |   |      | 0v      |     |     |
  |   4 |   7 | GPIO. 7 |   IN | 1 |  7 || 8  | 1 | ALT5 | TxD     | 15  | 14  |
  |     |     |      0v |      |   |  9 || 10 | 1 | ALT5 | RxD     | 16  | 15  |
- |  17 |   0 | GPIO. 0 |   IN | 0 | 11 || 12 | 0 | IN   | GPIO. 1 | 1   | 18  |
+ |  17 |   0 | GPIO. 0 |  OUT | 0 | 11 || 12 | 1 | IN   | GPIO. 1 | 1   | 18  |
  | 27  | 2   | GPIO. 2 | IN  | 0   | 13  |     | 14  |     |     | 0v      |     |     |
  | --- | --- | ------- | --- | --- | --- | --- | --- | --- | --- | ------- | --- | --- |
  | 22  | 3   | GPIO. 3 | IN  | 0   | 15  |     | 16  | 0   | IN  | GPIO. 4 | 4   | 23  |
Now I can capture temperature, humidity, barometric pressure and CO2 level! So cool.
Make another one

Setup Firestore
Generate service account key
Install Go
Oh, there are golang packages for raspi out of the box!
sudo apt install golang
It's too old
The raspi apt repository's golang is too old. It's 1.11.6. So it gets an error like:
$ go run read.go
# golang.org/x/net/http2
../go/src/golang.org/x/net/http2/client_conn_pool.go:305:6: undefined: errors.Is
../go/src/golang.org/x/net/http2/server.go:234:72: undefined: tls.VersionTLS13
Download go1.16.4.linux-armv6l.tar.gz from https://golang.org/dl/.
https://golang.org/dl/go1.16.4.linux-armv6l.tar.gz
Install dependencies
## Install individually
go get firebase.google.com/go
go get cloud.google.com/go/firestore
go get google.golang.org/api/iterator
go get google.golang.org/api/option
Or maybe I should do:
go get github.com/craftzdog/anavi-phat-sensors-recorder-firestore
Install NodeJS
Turns out that Golang is too heavy to run on Raspi Zero. Use NodeJS instead.
pi@raspberrypi:~ $ curl -fsSL https://deb.nodesource.com/setup_16.x | sudo -E bash -

## Installing the NodeSource Node.js 16.x repo...


## You appear to be running on ARMv6 hardware. Unfortunately this is not currently supported by the NodeSource Linux distributions. Please use the 'linux-armv6l' binary tarballs available directly from nodejs.org for Node.js 4 and later.
Oops...
wget https://unofficial-builds.nodejs.org/download/release/v16.1.0/node-v16.1.0-linux-armv6l.tar.gz
tar -xzvf node-v16.1.0-linux-armv6l.tar.gz
rm node-v16.1.0-linux-armv6l/{CHANGELOG.md,LICENSE,README.md}
sudo cp -r node-v16.1.0-linux-armv6l/* /usr/local/
Firebase not working on Armv6..
> require('./firestore')


#
# Fatal error in , line 0
#

#
# Fatal error in , line 0
# Liftoff bailout should not happen. Cause: Armv6 not supported

#
#
#
#FailureMessage Object: 0xb49fb2a8
Illegal instruction
Try to implement it with REST API.
It doesn't work:
const path = require('path')
const fetch = require('node-fetch')
const serviceAccount = require(path.join(__dirname, 'service-account-key.json'))

const baseUrl = `https://firestore.googleapis.com/v1/projects/${serviceAccount.project_id}/databases/(default)/documents/conditions`

async function main() {
  /*
  const res = await fetch(baseUrl);
  const data = await res.json();
  console.log("data:", data);
  */

  const response = await fetch(baseUrl, {
    method: 'post',
    body: JSON.stringify({
      fields: {
        test: {
          booleanValue: true,
        },
      },
      createTime: new Date().toISOString(),
      updateTime: new Date().toISOString(),
    }),
    headers: { 'Content-Type': 'application/json' },
  })
  const data = await response.json()
  console.log('data:', data)
}

main()
It's hard to implement oAuth! Gave up.
Configure crontab
root:
*/5 * * * * /usr/bin/python -m mh_z19                > /home/pi/anavi-phat-sensors-ui/data/MH_Z19.json
*/5 * * * * /home/pi/anavi-phat-sensors-ui/sensors/HTU21D/HTU21D > /home/pi/anavi-phat-sensors-ui/data/HTU21D.json
*/5 * * * * /home/pi/anavi-phat-sensors-ui/sensors/BMP180/BMP180 > /home/pi/anavi-phat-sensors-ui/data/BMP180.json
*/5 * * * * /home/pi/anavi-phat-sensors-ui/sensors/BH1750/BH1750 > /home/pi/anavi-phat-sensors-ui/data/BH1750.json
Get help